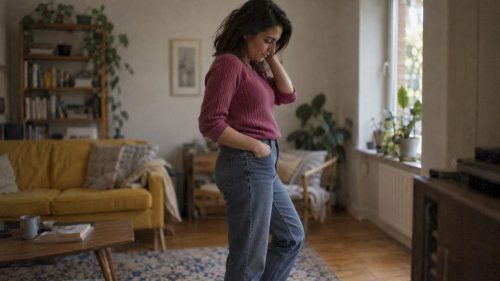
To look natural in photos, angle your shoulders away from the camera, relax your jaw and let a small movement run through the shot, like a slight weight shift or a turn of the head. Key techniques that make this work include a soft shoulder angle, a genuine “smize” instead of a fixed grin, and motion, however small, right as the shutter fires.
TL;DR:
- A slow exhale before each frame drops raised shoulders and neck tension; keep your knees soft, then shift your weight once settled.
- Choose clothes that leave your shoulders free, favor neutral colors or mid tones, and test the outfit at home before the shoot.
- Shade, window light, or golden hour softens facial shadows; pair it with a simple background and check exposure on the face.
- Ask the photographer for conversation, a brief task, or a burst of frames, and speak up when a prompt or pose feels awkward.
Table of Contents
- Quick posing adjustments that feel natural
- Expressions and eyes: how to look genuine
- Movement and candid techniques photographers use
- Clothing, grooming and small styling choices that read ‘natural’ on camera
- Lighting, composition and background: make scenes feel effortless
- Practice and mindset: exercises photographers recommend
- Posture and breathing: the groundwork beneath any pose
- Working with your photographer to stay comfortable
- Preparing mentally and physically before the shoot
- Spotting the difference: natural versus posed photos
- Using props and environment to add authenticity
- Photographer’s perspective: how pros get subjects to relax
- When a directed portrait session is worth booking
- FAQ
- Sources
Quick posing adjustments that feel natural
Most stiff photos come down to one thing: standing square to the camera with both feet planted and arms locked. A few small adjustments fix that instantly.
Turning your shoulders slightly away from the lens and shifting your weight onto your back leg creates a gentle S-shape through the body, which reads as relaxed rather than braced. Instead of facing the camera head-on, angle one shoulder back and let your hips follow with a subtle shift. Your hands matter more than people think: a pocket, a light touch to your hair or the edge of your jacket gives them somewhere to rest, whereas clenched fists or stiff, straight arms broadcast tension.
- Turn your shoulders away from the camera and shift weight onto your back leg for a natural curve.
- Lead with one shoulder back and let your hips shift slightly rather than squaring up.
- Rest your hands lightly in a pocket or against your hair instead of clenching them.
- Tuck your chin a touch and vary your head tilt between shots for a flattering angle.
None of these need to look obvious. The goal is a body that looks like it just arrived at that position, not one that’s been arranged.
Expressions and eyes: how to look genuine
A forced smile sits only in the mouth. A genuine one shows in the eyes too, often called “smizing”, where the muscles around the eyes soften along with the mouth corners rather than a wide, fixed grin held for the camera.
You can trigger that look on demand. Think of something that actually makes you laugh, recall a specific memory, or picture someone whose company you enjoy. That flicker of real feeling reads on camera in a way that “say cheese” never does.
- Relax your jaw and let your mouth corners soften rather than stretching into a wide smile.
- Think of a real memory or person to trigger a genuine reaction instead of performing one.
- Try looking slightly off camera, down, or straight into the lens to shift the mood of a shot.
- Avoid holding one fixed smile for several frames; let your expression change naturally between them.
Pro Tip: Ask for a burst of frames rather than one static shot. The micro-expressions in between the “posed” ones are usually the most natural.
Movement and candid techniques photographers use
Stillness is often what makes a photo look posed. Introducing small, continuous movement gives a photographer something to work with and takes the pressure off holding a single position.
- Walk slowly, turn slightly, or sway gently while the photographer shoots through the motion rather than stopping to pose.
- Give your hands a task: adjust a sleeve, hold a coffee, or glance at an object nearby to take the focus off “performing” for the lens.
- Respond to simple prompts: answer a quick question, tell a short story, or look away and then back on cue.
- Let the shutter catch the moment after a laugh or comment, when your expression hasn’t yet reset to neutral.
This is also why candid-style shoots tend to feel more authentic than rigid studio sittings: the subject is doing something, not just standing for a camera. Professional photographer Suki Dhanda has described how building a connection with a subject and waiting until they drop their guard produces more compelling portraits than a static, held pose.
Clothing, grooming and small styling choices that read ‘natural’ on camera
What you wear affects how easily you can move, and movement is central to looking relaxed. Choose clothes that fit comfortably and don’t restrict your arms or shoulders, and steer clear of tiny, high-contrast patterns that create visual noise on camera.
Colour matters too. Mid-tones and neutrals tend to flatter most skin tones and sit well against most backgrounds, while very bright or clashing colours can pull attention away from your face.
- Pick clothes that let you move freely rather than ones that pull or restrict at the shoulders.
- Favour neutral or mid-toned colours over busy, high-contrast patterns.
- Keep hair off your face, tame flyaways, and use a light matte product to reduce shine.
- Try your outfit on in advance and practise a couple of poses in it to check you can move comfortably.
A quick trial run at home, in front of a mirror, catches problems before the shoot that no amount of posing advice can fix on the day.
Lighting, composition and background: make scenes feel effortless
Soft, even light is the single biggest factor in a natural-looking photo. Shade, window light or golden hour all flatter skin and avoid the squinting and harsh shadows that direct midday sun causes. The BBC’s photography guidance notes that soft, even light such as shade or overcast conditions is both flattering and easy to work with, which is why many outdoor portrait sessions are timed around early morning or late afternoon.
Keep the background simple, or use a shallow depth of field so the eye lands on you rather than on clutter behind you. Small changes in camera height, slightly above or below eye level, shift the mood of a shot and can be more flattering than a dead-on angle.
- Shoot in shade, by a window, or during golden hour rather than harsh direct sun.
- Simplify the background or blur it with a shallow depth of field.
- Adjust camera height slightly above or below eye level to change the feel of the shot.
- Check exposure on the face and watch for blown highlights or deep shadows.
A well-lit, high-resolution original image also matters if you plan to refine a photo afterwards: Adobe’s guidance on AI portrait tools notes that starting with a high-resolution, well-lit image with visible facial detail gives the best results when adjusting backgrounds or lighting later.
Practice and mindset: exercises photographers recommend
Camera confidence is built, not innate. Spending time taking self-portraits at home helps you learn your best angles, your preferred lighting and which expressions actually look like you, turning the camera into something familiar rather than a source of nerves, a point photographers make when discussing easy ways to improve your pictures.
The same piece notes that photographers often lean on conversation, open questions or humour during a shoot, catching people mid-reaction rather than mid-pose, because forced smiles tend to look exactly like what they are.
- Run a short selfie session regularly to learn your angles and lighting.
- Practise in front of a mirror and review which expressions feel most like you.
- Use conversation or a light task during a shoot rather than holding a static pose.
- Let a few imperfect, spontaneous frames through: acclaimed photographers have argued that embracing spontaneity often produces the most truthful images.
Pro Tip: Review your self-portraits after taking a break, not immediately. A little distance makes it far easier to judge which expressions genuinely look like you.
Posture and breathing: the groundwork beneath any pose
Good posing sits on top of good posture, and good posture starts with how you’re breathing. Shallow, held breath raises your shoulders towards your ears and tightens your neck, which shows up on camera as stiffness even if your pose is technically correct.
Before a shot, take a slow breath in, let your shoulders drop as you exhale, and lengthen through the back of your neck rather than pushing your chin forward. This single habit does more to fix a “stiff” look than most posing instructions, because it resets your whole upper body rather than one joint at a time.
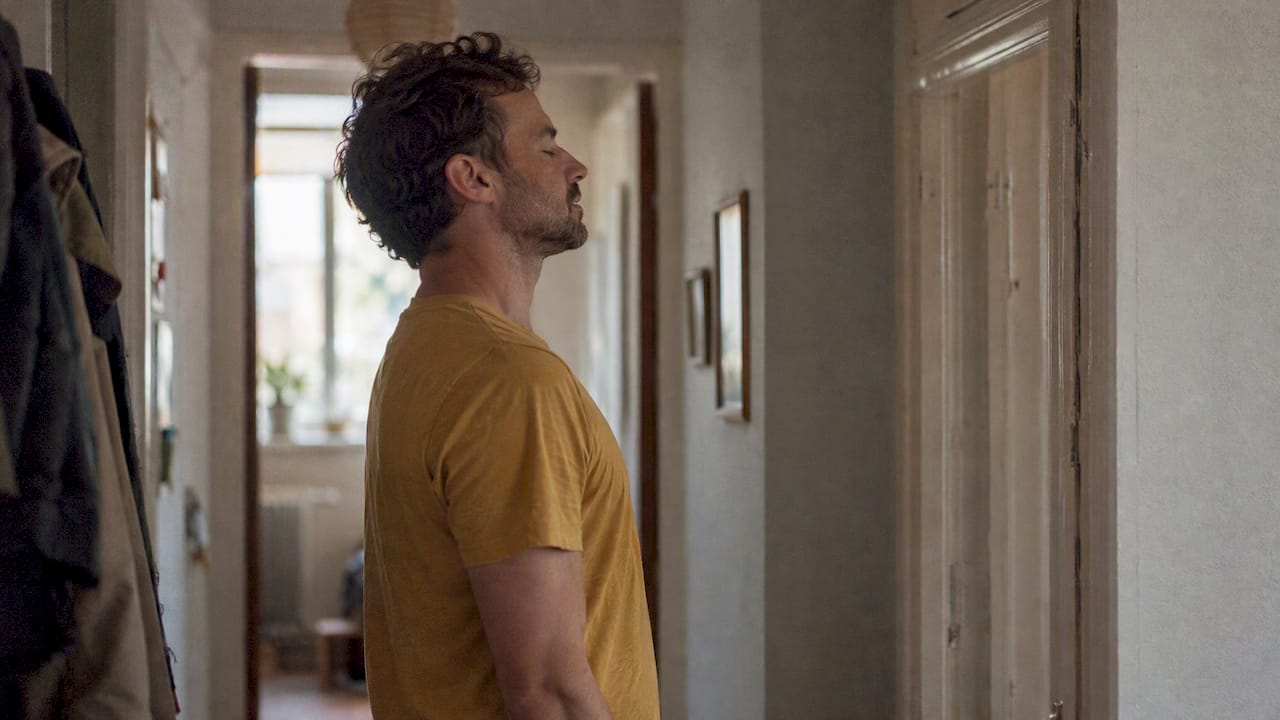
Stand with your weight evenly distributed, then shift it slightly onto one leg once you’re settled, rather than locking your knees. A soft, slightly bent stance photographs as calm; a braced one photographs as nervous, even when your face looks fine.
If you catch yourself holding your breath mid-shoot, which happens to almost everyone in front of a camera, pause, exhale fully, and reset before the next frame. A photographer who notices this will usually give you a moment rather than rushing through it, so there’s no need to push through a held breath just to keep things moving.
Working with your photographer to stay comfortable
The dynamic between you and whoever is holding the camera affects your face more than any pose does. A photographer who talks you through the shoot, explains what they’re doing and checks in between frames gives you far less to be anxious about than one who shoots in silence.
Don’t be afraid to ask questions: how does this look, should I adjust anything, can we try something different. This turns the session into a conversation rather than an inspection, and it’s usually in those exchanges that the most natural expressions appear.
If a particular prompt or pose feels awkward, say so. A good photographer would rather adjust than have you hold a position you’re visibly uncomfortable in, since discomfort always shows on camera eventually. Equally, if something is working, mention that too: feedback in both directions keeps the session moving and keeps your expressions responsive rather than held.
Small talk, a shared joke, or simply narrating what you’re doing (“I’m just going to lean here a second”) all help keep your face active between the moments when the camera actually fires, which is often where the best frames come from anyway.
Preparing mentally and physically before the shoot
The groundwork for a relaxed photo starts well before the camera comes out. Getting a reasonable night’s sleep, staying hydrated and eating something beforehand all affect how your face holds tension, puffiness and colour show up more under stress or fatigue than most people expect.
Mentally, it helps to arrive with a loose idea of what you want from the session rather than a rigid list of poses to hit. Knowing the general purpose, a relaxed portrait, a set for a specific use, a record of an event, gives you something to anchor to without needing to control every frame.
Arrive a few minutes early rather than rushing in. A calmer arrival means less visible tension in the first several minutes of shooting, which is often when people look stiffest anyway. If nerves are a real issue, naming that to your photographer beforehand means they can build in more warm-up time and easier prompts at the start.
Spotting the difference: natural versus posed photos
The difference between a natural photo and an obviously posed one usually comes down to a handful of details rather than one big flaw. A posed shot often shows square shoulders, arms pinned to the sides, a single held smile and a dead-level, direct stare into the lens.
A natural shot, by contrast, tends to show an angled body, a slight gesture mid-motion, asymmetry in the smile and eyes that are focused on something rather than fixed on the lens itself. The hands tell a clear story too: visibly tense fingers or fists read as posed, while a loosely held object or a hand resting against fabric reads as relaxed.
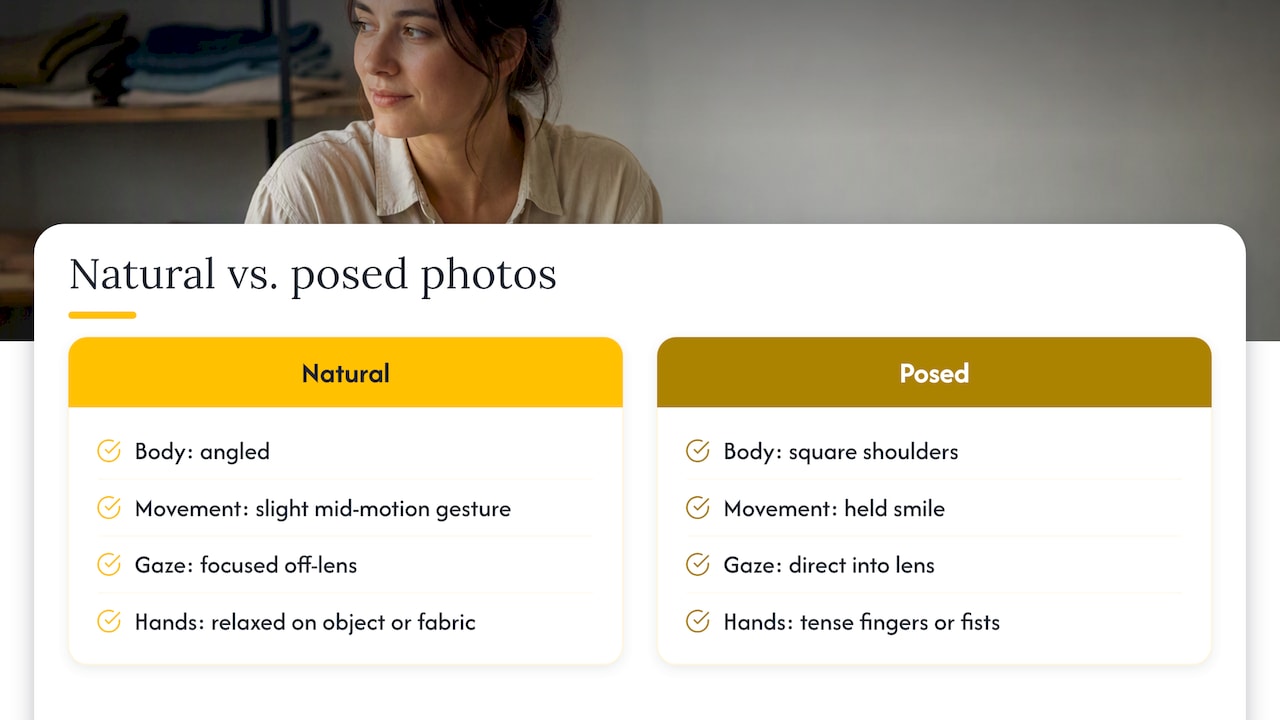
Lighting flattens the comparison further. A natural-feeling photo usually has soft, even light with no harsh shadow lines across the face, while a stiffer-looking one often has flatter, more direct light that exaggerates a fixed expression.
Using props and environment to add authenticity
An empty, static pose with nothing to interact with is one of the hardest things to make look natural. Giving your body something real to do solves the problem without any extra posing instruction.
Leaning on a wall, resting against furniture, or holding an everyday object such as a book, a mug or a jacket gives your hands and posture somewhere to settle rather than hanging awkwardly. Suki Dhanda’s approach to portraiture reflects this directly: when a subject seems self-conscious, having them interact with their surroundings rather than stand upright and still reduces visible stiffness.
The environment itself can do similar work. Shooting in a space that’s genuinely relevant to you, a kitchen, a workspace, a favourite café, gives you something to engage with and gives the photo context beyond just a face on a plain background. The result tends to look like a moment rather than a sitting.
Photographer’s perspective: how pros get subjects to relax
Most portrait sessions open with small talk, not instructions, because a subject who’s mid-sentence rarely looks stiff. Suki Dhanda’s approach of building rapport before worrying about the shot reflects something most working photographers would agree with: trust comes before a good expression, not after it.
A simple prompt like “tell me about your week” or “look at that for a second, then back to me” usually does more than any posing direction. A directed session gives you that guidance throughout; photographing yourself means supplying it on your own.
— Emmet
When a directed portrait session is worth booking
A directed session takes the guesswork out of everything covered here. We build rapport before the camera comes out, manage the lighting so you’re not fighting harsh shadows, and give you prompts throughout so your expressions stay genuine rather than held.
If you’d rather have someone guide the angles, timing and setting than work it out alone, our portrait packages cover individuals, personal brands and teams, with a portfolio you can look through before booking.
FAQ
How to make an AI photo look natural?
Start with a high-resolution, well-lit original image with clear facial detail, since AI portrait tools work from what’s already there rather than inventing missing detail. Adobe’s own guidance on its headshot tools recommends this as the basis for realistic background and lighting adjustments.
How do I edit pictures of nature?
Editing nature photography generally follows the same basics as portrait editing: correct exposure first, then adjust contrast and colour balance before anything stylistic. Background and lighting tools built for portraits, such as those in Adobe Firefly, can also be applied to landscape or nature shots for quick cleanup.
What does natural photo mean?
A natural photo generally shows a relaxed body, a genuine expression and soft, even lighting, rather than a rigid pose, a fixed smile or harsh direct light. It tends to capture a moment of real reaction or movement instead of a held, static position.
How do I make my face look better in a picture?
Soft, even lighting such as shade or golden hour flatters most faces far more reliably than harsh direct light, which the BBC notes is both easy to work with and widely recommended for portraits. Relaxing your jaw, softening your mouth corners and slightly angling your head rather than facing the camera dead-on also help considerably.